•Department of Conservation
•Fiordland Adventure
Photo album:
•New Zealand
Download GPS file:
• GPS track & waypoints


This section covers the most adventurous route on this trip: the Percy saddle. The dirt road that connects the Doubtful Sound to the West Arm of the Lake Manapouri is very well maintained, in part to bring tourists back and forth. Apparently, it's also very steep. The section from the West Arm to the Tuatepere road is mainly to maintain the power lines originating at the West Arm power station. The road goes up the Percy saddle but that pass is too steep on the other side. The power lines just hang from the towers at the saddle to the next ones at the bottom of the drop. The road is simply missing and it only resumes at the bottom towers. This missing kilometer is replaced by a steep and slippery trail where you have to haul your bags and wheel or carry your bike through screes and dense forest. Don’t even think about doing it the other direction! The rest of the Borland road is just fine, being the Borland saddle the only hurdle.
We first rode from Te Anau to Manapouri. That ride was an easy one: 21 Km pretty flat and with a gorgeous day for us. It took us less than 2 hours.
Route index:
November 30, 2013: From West Arm to Wilmot Pass adn back (Profile)
December 1, 2013: From West Arm to South Arm (Profile)
December 2, 2013: From South Arm to Manapouri (Profile)
Route profile (from West Arm to Manapouri via Percy and Borland saddles)

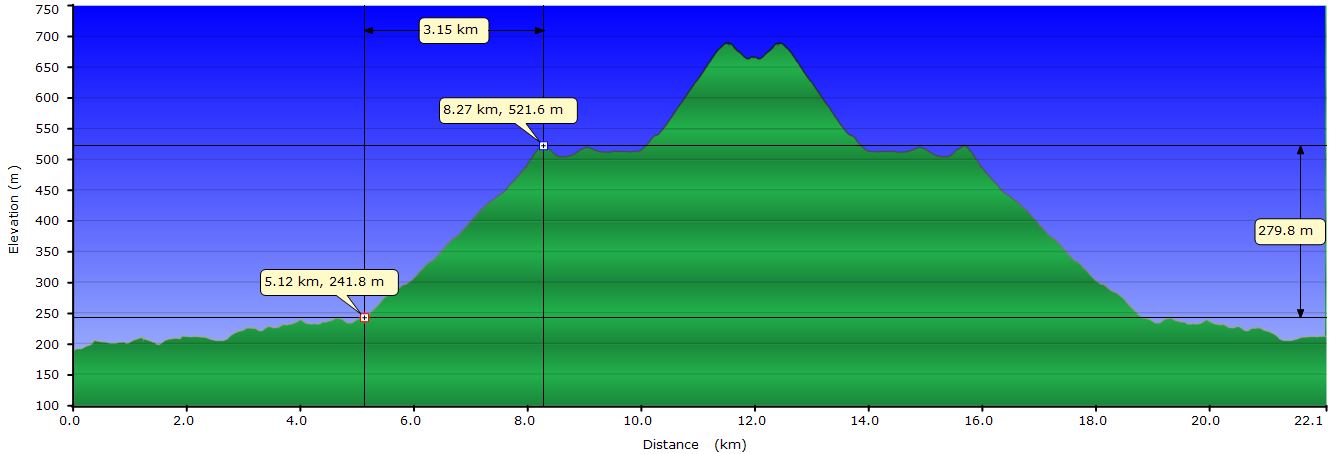
November 30, 2013: From West Arm to Wilmot Pass and back
 We arrive into the small town of Manapouri and go straight to the office of Fiordland Adventure, a local outfitter that organizes kayak trips in the Manapouri Lake and fiords. We have been communicating with Jo over e-mail for the last days. She has been very helpful getting information about the Percy and Borland saddles, where we are headed. We also want to rent one of their kayaks to go on our own around the lake but not today, since the ferry towards the West Arm is about to leave. She helps us again to buy the tickets and off we go riding to the Pearl Harbour, down the main road.
The ferry ride is beautiful. From the boat we can appreciate the steep snowed peaks surrounding the lake and the waterfalls falling from them. The islands add some additional interest and make us think that it would be probably worth exploring with the kayak. As we get close to the power plant at the shore of the West Arm, we see the road climbing towards the Percy Pass.
 The sandflies welcome us at the small information center. After asking for directions to the bus drivers taking tourists to the Doubtful Sound, we flee for the DOC hut. It’s on the main road to the Doubtful Sound, past the junction to the power plant worker’s hostel (bridge). We first cross the bridge and get to the hostel. They tell us where the hut is. We cross the bridge back and continue on the main gravel road. Approximately 250 meters from the bridge, the road to the hut appears on the left hand side. It’s a unattended, very small hut with 6 beds, a table and a countertop. We leave most of our gear there and go to the Doubtful Sound viewpoint, 10 Km from the hut.
The gravel road to the viewpoint is mainly uphill till the Wilmot Pass with a total elevation gain of 500 m. The scenery is superb: exuberant vegetation and lots of waterfalls everywhere, some of them right next to the road. In particular, a couple of them were covered by green and brown-reddish moss. A short drop after the pass is the left fork to the viewpoint. The view is spectacular. The narrow fiord is almost a canyon on the right side. That’s where the Helena Falls are, right at the beginning of the sound. Although it has only rained 1 day for the last week, the falls create a mist from the very top to the sea surface. We enjoy the view while having lunch. Judit suffers an allergic reaction probably to a sandfly bite in her eyelid. It’s not too painful, just itchy. Her top and bottom eyelids swallow quite a bit and she looks funny with one eye almost closed by reddened inflamed eyelids. She looks like her eye got stuck in an irritated wink.

The way back to the hut is easy and quick. Once there, we spend most of the evening planning the next two days.
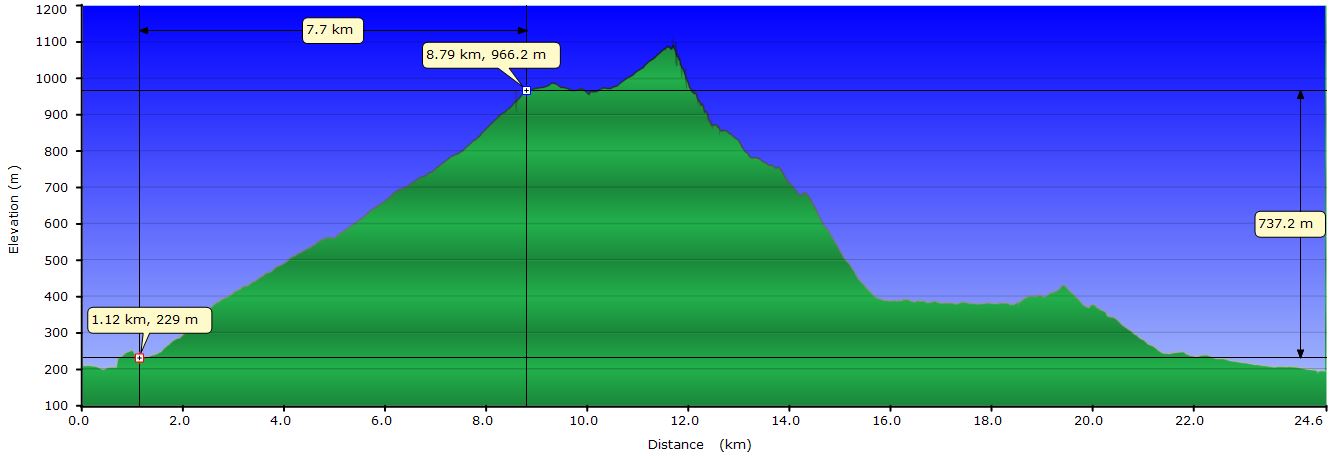
December 1, 2013: From West Arm to South Arm
We start riding at about 10 AM after filling up our bottles from the stream on the road close to the hut. We ride towards the hostel (crossing the bridge) but instead of turning right to get to its entrance, we keep straight on an unsigned dirt road. The road is in very good conditions and dry. We start climbing on this road and after 2.6 Km we find the first power tower. A few meters ahead there is a side road to the left, probably to service the tower over there. We will find many of these side roads along the main road. Just stick to the most travelled one. There are several streams where you can get water. On our GPS track we have marked the ones with higher flow.
The road started climbing at Km 1.5 at a fairly constant rate of 100 m/Km until Km 9. Then a flat area with several small lakes appears. The vegetation here is just grass and a few isolated shrubs. At Km 10.6 the climb resumes for 1 more Km until the Percy Saddle. The Percy Saddle (1080 m) is at Km 11.6. Here we find some workers from the power lines that take us to the first marker of the hike-a-bike and show us the “trail”.
 On the saddle there are 4 towers. Ride on the road to the left and pass under one of them. You should see the first marker of the ordeal. It’s a black metal rod with orange paint at the tip. From that first marker, look down on the direction to the towers at the bottom (but before the first trees) and you should see some triangular orange markers down the slope, after the scree (landslide from 2 years ago, according to the power line workers). There are other markers before those triangles but those are rods and not so visible from the top. Also from the first marker you can see the road where you are heading to, next to the left power line as you look down. Disassemble your panniers here. Following is a detailed roadbook of the hike. If you have a GPS, you can download the track and the markers waypoints. We may have missed 2 or 3 markers so don’t keep an exact count.
For the first stretch from the first marker, stick to the top edge of the scree. You should not cross it or just barely. Look for marker 2, another rod with orange tip. Transport you bike and bags carefully. Even on a sunny day like today, the terrain is wet and slippery. A fall here could be a long one down the scree. The slope of the mountain is steep but the vaguely marked path is not that scary. You can wheel your bike without major problems. Just keep it on the valley side so if you slip it won’t fall on top of you. Once you get to marker 2, you’ll probably see marker 3. Marker 3 consists of 2 broken (and shorter) pieces of a marker and not so visible. Don’t go as low as this marker 3, stay a little higher and work your way to marker 4, the triangular one, right at the tree line.
Cross the tree band and keep moving without losing too much elevation for 100 m. You should see now marker 5. Go down the slope till you reach it. Keep following the markers. After marker 9 you will find some fallen trees blocking the natural path. Go down the slope as a detour and come back up some to the trail and to marker 10. The markers from here on are closer to each other and easier to follow. It’s not possible to mount the panniers until you reach the road. The difficulty of the terrain varies but in general it’s steep, narrow and slippery. You can wheel the bike at stretches but you have to carry it for long intervals. There are some ups but you will be downclimbing 95% of the time. Most of the hike is in thick forest but we didn’t have to fight too much with the branches (and one of our bikes had long handle bar ends).
From maker 1 is 1 Km to the beginning of a single track ridable trail (Km 12.7) but you’ll be walking that distance 3 times will all the hauling. A good idea is to load you backpack (if you have one) as much as possible and keep your panniers light, since the backpack is more comfortable to carry. The total descent is about 225 m. It took us 3 hours and 40 minutes. From this single track, the road is just 50 m ahead. Take the right fork going down (not the left going up to the tower). It wasn't that bad, but we had the weather on our side. I can imagine how miserable it could be under the rain.
The road on this side of the saddle is much steeper and quite rocky. If you have good skills you can ride almost all of it, except for a few short stretches where the size of the loose rocks would make it not that safe. After a bunch of switchbacks you drop to the valley at Km 16 since the beginning. But remember that if you carry your GPS up and down while hauling your panniers, your reading will be wrong. From here, the terrain is flat until Km 18.5.
 At Km 18.5 you’ll cross a bridge. Go to the left after the short climb. You’ll climb for about 1 Km and then drop through some more zigzags to the bridge over the river at Km 22. Go left and ride for 2.7 more Km to the South Arm. The official campground is to the right when you arrive at the beach. There is a pit toilet at the campground, but no shelter or hut. The sandflies are definitely bad, but DEET works and although they swarm you a couple of minutes after you arrive, they don’t land on you. At night we thought a light rain was falling but we realized it was the hundreds of sandflies landing on our tent. I’m not kidding!
The total route is 24.7 Km and took us approximately 9:30 hours on a sunny day. There is no water on the hike portion. The first stream/waterfall is at Km 13.7 where delicious fresh water drips down a vertical rock on the left hand side.
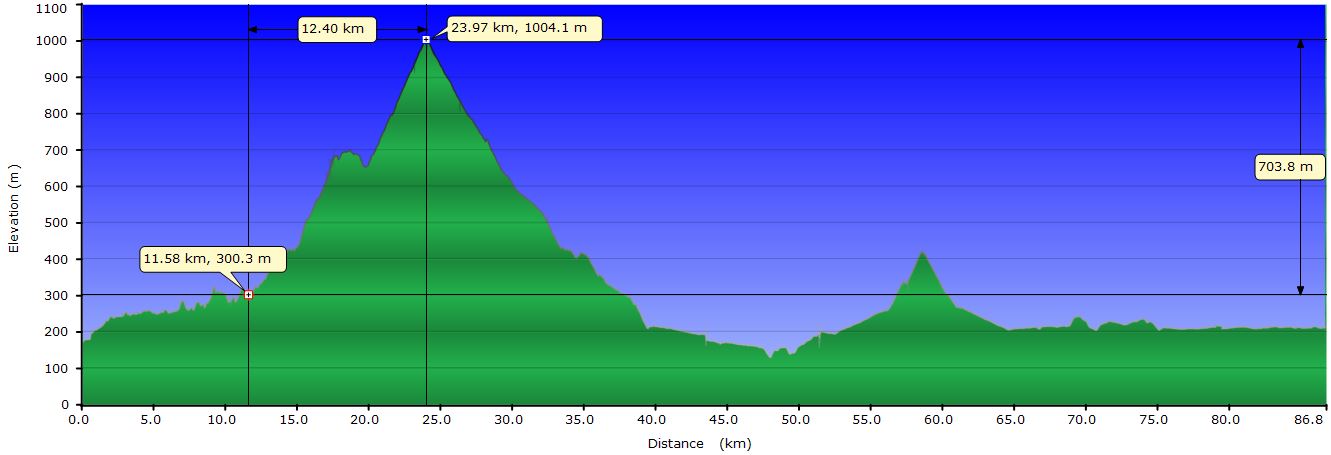
December 2, 2013: From South Arm to Manapouri
 World record in fastest tent pick up. A few hundred sandflies are packed with it though. We pass the bridge we crossed yesterday and continue South. At Km 4.5 we pass by a building, probably from the tower maintenance crew. The wide road has some ups and downs up to Km 11.5 where the serious climb starts. From here to the pass there are 12.5 Km and a total elevation gain of 700 m. Despite the climb, the ride is very enjoyable. The birds calls seem out of place. They sound like tropical birds and one would expect a jaguar to jump out of the dense forest to cross the road.
At Km 17.5 there is an excellent lookout: the Grebe Valley viewpoint. If you look towards where you just came, you’ll see the scar the power lines have left on the terrain. Just look to the other side and enjoy the view of the lakes at the bottom of the valley.
The road up to the Borland saddle follows the power line towers that unfortunately are always in sight. But after a while you filter them out and everything looks beautiful. At Km 21.7 you reach the Borland shelter junction. We didn’t take the time to check it out. At this fork, there is a nice and easy access creek to replenish your bottles.

At Km 24 from the South Arm is the Borland Saddle (1004 m). Get ready for an exhilarating downhill of 800 m in 15 Km. There are several turn-outs but you should follow the main road. The Borland Lodge is at Km 40. We were planning to spend the night here but we are still fresh and decide to continue towards Manapouri. At Km 46 you’ll find the paved road and at Km 51.5 the road that links Tuatapere with Manapouri. From there it’s 35 Km to Manapouri. There is only a significant hill on this road of about 250 m that tops at Km 58.5 from the beginning.
After 86 Km we arrive at Manapouri and head for the Manapouri Lakeview Motor Inn where they offer decent food and nice rooms.